
Introduction Post
Docker and Kubernetes are two popular tools to run containers at scale.
So what’s the problem with getting both of these tools on Windows?
Containers come in two flavours: Windows and Linux containers.
However, the majority of the time, when people say containers, they refer to Linux containers.
Unfortunately, you can’t run Linux containers on a Windows host or vice versa.
That’s because containers expect to use the kernel of the operating system they’re designed for.
A Linux executable expects a Linux host, and there’s no way to run it on Windows!
But there’s a workaround.
You could create a Virtual Machine that runs Linux on your Windows host.
This will let every Linux application or executable run inside a container in the virtual machine.
So how do we choose the right Virtual Machine?
It depends on your hardware and operating system.
There are several options available.
Today, you’re going to determine which combination is best for you and get up to speed on how to install it.
Specifically, we’re going to look whether you should install Docker through Docker for Windows or Minikube AND whether you should use Minikube, Kind, or K3s for Kubernetes.
The challenge with running Linux containers on Windows 10
Containers are processes that are isolated from the rest of the operating system but still use their resources.
Imagine clicking on an icon on your desktop and launching an application — the application runs unrestricted and can use as many CPU and memory as needed.
If you execute the same application but within a container, not only you can define how much memory and CPU it will use at most, but you can also restrict access to the filesystem, network, etc.
Containers use the underlying operating system to offer a restricted view of the resources available.
If your operating system is Windows, you can isolate Windows applications in containers.
The same is the case for Linux.
However, if you want to run Linux containers on Windows, you can’t unless you run a Linux host.
You have a few options when it comes to running Linux on your computer, but it all boils down to running a virtual machine.
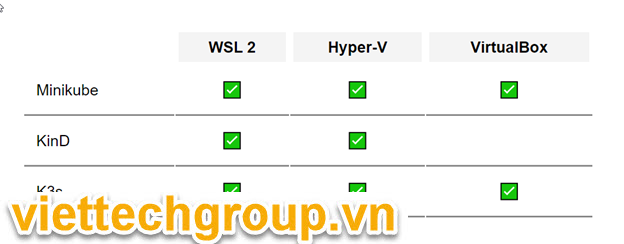
Here’s a quick summary:
What options you have to run containers on Windows 10?
Docker is a tool designed to run containers.
It can run both Windows and Linux containers, but in this guide, you will focus primarily on Linux containers.
When Docker for Windows was released, it supported Hyper-V as its virtualization technology.
In other words, every Linux container that you created ran inside a virtual machine in Hyper-V.
Hyper-V is a Type-1 hypervisor and thus provides excellent performance for running virtual machines on Windows.
Then in May 2019, Windows Subsystem for Linux 2 (WSL 2) was announced.
WSL 2 runs a Hyper-V virtual machine with Linux inside — just like Docker does.
Why is WSL 2 a big deal?
WSL 2 runs on top of the Windows Hypervisor (Hyper-V), which is a bare-metal hypervisor.
You can expect the best type of performance from this hypervisor.
WSL 2 also supports memory reclaim, and this means that the system uses only the right amount of RAM required for running the Linux kernel.
And best of all, WSL 2 offers deep integration with the rest of the Windows host.
You can navigate and copy files across the virtual machine as if it were natively on Windows.
Wouldn’t it be great if you could use WSL2 to run your Docker containers?
If you’re running WSL 2, Docker for Windows integrates with it automatically, and it leverages the existing WSL 2 virtual machine to run your containerised applications.
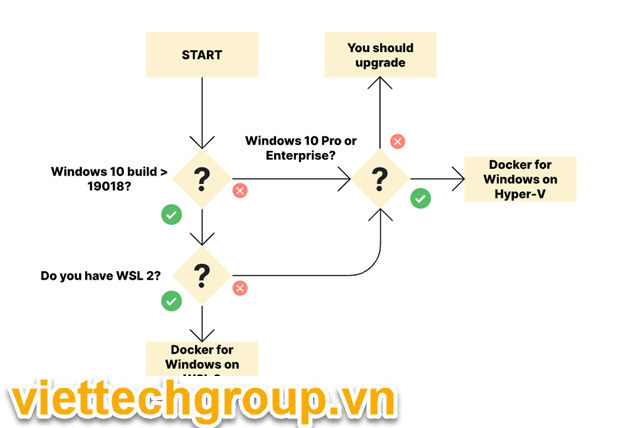
If your Windows 10 build is higher than 19018, you should be easily able to install it.
You can check your build version with the following command:
PS C:\Users\Administrator> Get-ComputerInfo OsName,OsVersion,OsBuildNumber

OsName                                    OsVersion  OsBuildNumber
------                                    ---------  -------------
Microsoft Windows 11 Pro for Workstations 10.0.22000 22000


PS C:\Users\Administrator>
You can follow the instructions on how to install WSL 2 here.
In case you don’t have access to WSL 2, that’s where things get a bit tricky.
Without WSL 2, your second best option for running Linux containers on Windows is using Docker for Desktop with Hyper-V.
In other words, rather then reutilising the Hyper-V virtual machine created by WSL 2, Docker for Windows creates a brand new virtual machine.
Unfortunately, not all Windows versions ship with Hyper-V.
Hyper-V is unavailable on Windows 10 Home, but ships with the Windows 10 Pro and Enterprise editions.
You can check if your computer supports Hyper-V with the following command:
PS C:\Users\Administrator> Get-WindowsOptionalFeature -Online -FeatureName Microsoft-Hyper-V


FeatureName      : Microsoft-Hyper-V
DisplayName      : Hyper-V Platform
Description      : Provides the services that you can use to create and manage virtual machines and their resources.
RestartRequired  : Possible
State            : Enabled
CustomProperties :
If you have Hyper-V, but it is disabled, you can enable it with: Enable-WindowsOptionalFeature -Online -FeatureName Microsoft-Hyper-V -All.
If your computer supports Hyper-V but not WSL 2, you can jump to the next chapter to install Docker for Windows on Hyper-V.
If your Windows installation doesn’t have WSL 2 or Hyper-V, you can’t install Docker for Windows unless you upgrade.
Installing Docker for Windows with WSL 2 or Hyper-V
Instead of downloading the binary and manually insert environment variables, this guide uses Chocolatey the Windows package manager to install Docker for Windows.
You can follow the instructions on how to install Chocolatey here.
With Chocolatey, you can install Docker for Windows with: choco install docker-desktop -y
choco install docker-desktop -y
Installing the following packages:
docker-desktop
By installing you accept licenses for the packages.
# truncated output
Installing docker-desktop...
docker-desktop has been installed.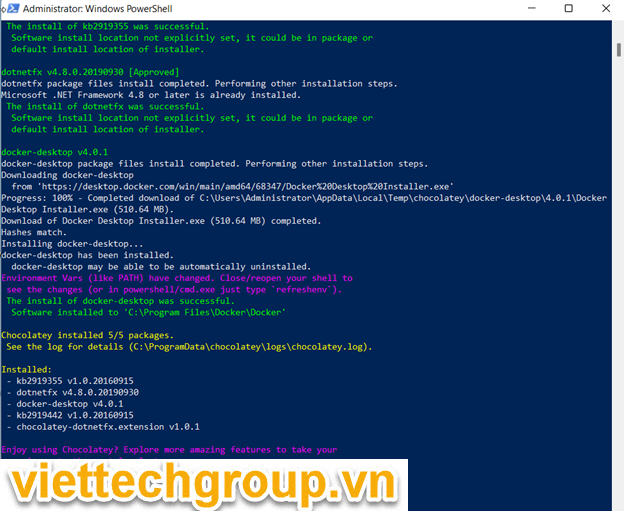
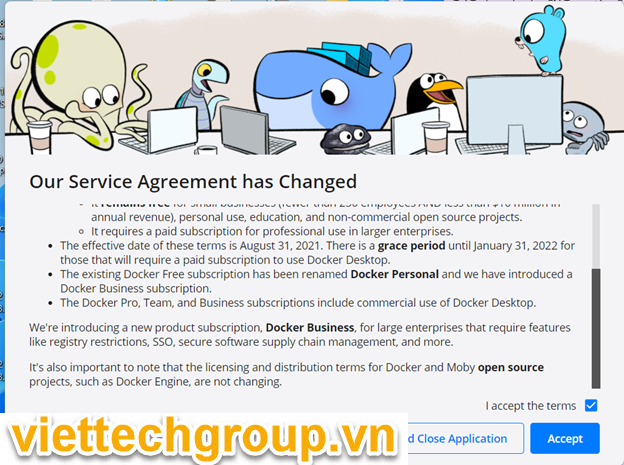
Once the installation is over, you can search in the Windows menu for Docker by typing its name.
If it’s there, restart your PC for the changes to take effect because, without it, it won’t run.
After the restart, you might see the following error:
This error arises when virtualization is disabled in the BIOS.
The easiest way to find this setting in your BIOS is to Google the query “enable virtualization in bios + laptop name/motherboard name”.
There’s a high chance you can find a tutorial specific to your machine that shows you all the steps to accomplish the task.
Once you make the changes, restart your machine and Docker should now work.
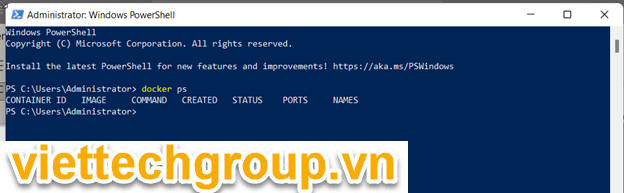
To confirm if it works, open PowerShell as an administrator and type:
PS C:\Users\Administrator> docker ps
CONTAINER ID   IMAGE               COMMAND                  CREATED             STATUS             PORTS                               NAMES
PS C:\Users\Administrator> docker run hello-world
Hello from Docker!
This message shows that your installation appears to be working correctly.
To generate this message, Docker took the following steps:
1. The Docker client contacted the Docker daemon.
2. The Docker daemon pulled the "hello-world" image from the Docker Hub.
(amd64)
3. The Docker daemon created a new container from that image which runs the
executable that produces the output you are currently reading.
4. The Docker daemon streamed that output to the Docker client, which sent it
to your terminal.
To try something more ambitious, you can run an Ubuntu container with:
$ docker run -it ubuntu bash
Share images, automate workflows, and more with a free Docker ID:
https://hub.docker.com/
For more examples and ideas, visit:
https://docs.docker.com/get-started/Excellent, now that you’ve installed Docker for Windows, you’re ready to install Kubernetes.
What options do you have for installing Kubernetes on Windows 10?
Similar to Docker, Kubernetes has constraints that you need to watch out for.
Kubernetes can run Windows and Linux containers.
However, you can only run Windows containers on Windows nodes and Linux containers on Linux nodes.
And there’s a further constraint: the Kubernetes control plane can only run on a Linux node.
In other words, Kubernetes will have to run inside a Linux virtual machine to operate correctly on Windows.
Here you have the same choice of virtual machines as you had with Docker:
- You can run Kubernetes in WSL 2.
- If your Windows version supports it, you can use Hyper-V to create a virtual machine or
- You can create a virtual machine using VirtualBox.
But choosing a virtual machine is only part of the challenge.
There are several tools designed to run a Kubernetes cluster locally.
In this guide, you will cover Minikube, Kind and K3s.
But how do you decide which method to install with?
Well, it depends on your use case.
- Are you getting started with Kubernetes and you need a fully working environment in no time? If so, Minikube will work just right.
- If you’re extending Kubernetes or you need to test Kubernetes using clusters larger than a single node, Kind is the way to go.
- If you have a low spec machine or want something that uses fewer resources, K3s is what you need.
After that, you need to look at your hardware capabilities.
The methods we’re going to look at demand anywhere from 2GB to up to 8GB of RAM.
To be specific, Minikube needs 2GB, Kind needs 8GB and K3s requires 2GB.
In most cases, your hardware will easily be able to support all three methods.
Once you know which methods your system is capable of running, you can look at your use case and choose your preferred method.
- Click here to learn how to install Minikube
- Click here to learn how to install Kind
- Click here to learn how to install K3s
Installing Kubernetes on Windows 10 with Minikube
Minikube is one of the most developer-friendly local Kubernetes cluster that you can install.
If you haven’t done so, install Chocolatey — the Windows package manager.
You can find the instructions here.
On Windows via Chocolatey (https://chocolatey.org/packages/minikube)
Open PowerShell as an administrator and execute: choco install minikube -y
PS C:\Users\Administrator> choco install minikube -y
Chocolatey v0.11.1
Installing the following packages:
minikube
By installing, you accept licenses for the packages.
Progress: Downloading Minikube 1.23.2... 100%

Minikube v1.23.2 [Approved]
minikube package files install completed. Performing other installation steps.
 ShimGen has successfully created a shim for minikube.exe
 The install of minikube was successful.
  Software install location not explicitly set, it could be in package or
  default install location of installer.

Chocolatey installed 1/1 packages.
 See the log for details (C:\ProgramData\chocolatey\logs\chocolatey.log).
PS C:\Users\Administrator>
Once the installation is complete, you can launch a local cluster with:
Minikube follows the same logic as Docker for Windows.
If WSL 2 has been installed, it will be used by default.
If WSL 2 isn’t available, Minikube will try to use the same Hyper-V virtual machine created by Docker for Windows.
Or Using curl install and add path
curl -Lo minikube.exe https://github.com/kubernetes/minikube/releases/latest/download/minikube-windows-amd64.exe
New-Item -Path "c:\" -Name "minikube" -ItemType "directory" -Force
Move-Item .\minikube.exe c:\minikube\minikube.exe -Force
Add Path
$oldpath=[Environment]::GetEnvironmentVariable("Path", [EnvironmentVariableTarget]::Machine)
if($oldpath -notlike "*;C:\minikube*"){`
  [Environment]::SetEnvironmentVariable("Path", $oldpath+";C:\minikube", [EnvironmentVariableTarget]::Machine)`
}
GET VM SWITCH
PS C:\Users\Administrator> Get-VMSwitch

Name           SwitchType NetAdapterInterfaceDescription
----           ---------- ------------------------------
Default Switch Internal
WSL            Internal
START MINI
You can also create a separate Hyper-V virtual machine with :
minikube start –vm-driver=hyperv
minikube start –vm-driver=hyperv –hyperv-virtual-switch=”Default Switch”
PS C:\Users\Administrator> minikube start --vm-driver=hyperv --hyperv-virtual-switch="Default Switch"
* minikube v1.23.1 on Microsoft Windows 10 Pro For Workstations 10.0.22000 Build 22000
  - KUBECONFIG=C:\Users\Administrator\.kube\config
* Using the hyperv driver based on existing profile
* Starting control plane node minikube in cluster minikube
* Creating hyperv VM (CPUs=2, Memory=6000MB, Disk=20000MB) ...
* Preparing Kubernetes v1.22.1 on Docker 20.10.8 ...
  - Generating certificates and keys ...
  - Booting up control plane ...
  - Configuring RBAC rules ...
* Verifying Kubernetes components...
  - Using image k8s.gcr.io/metrics-server/metrics-server:v0.4.2
  - Using image gcr.io/k8s-minikube/storage-provisioner:v5
* Enabled addons: storage-provisioner, metrics-server, default-storageclass
* Done! kubectl is now configured to use "minikube" cluster and "default" namespace by default
PS C:\Users\Administrator>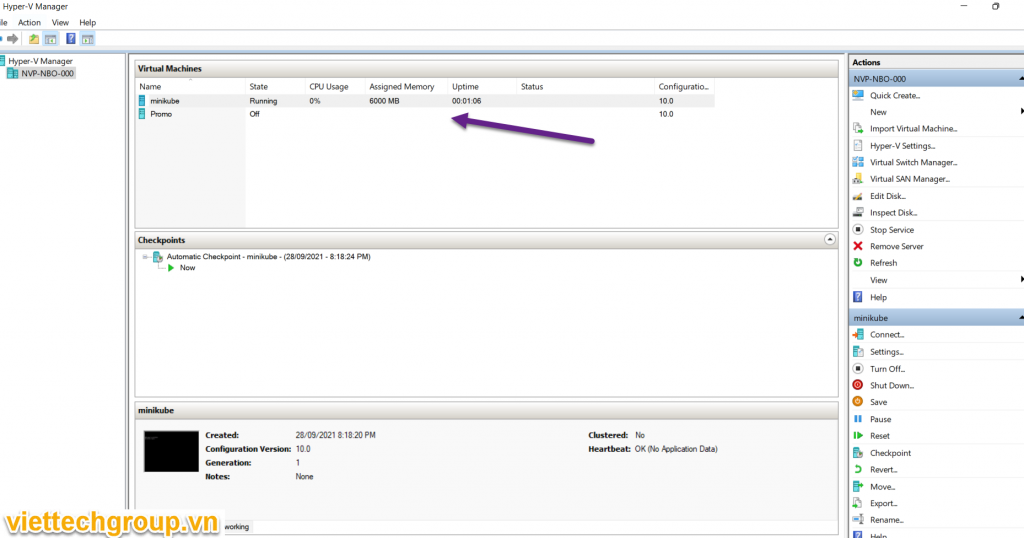
PS C:\Users\Administrator> kubectl get nodes
NAME       STATUS   ROLES                  AGE   VERSION
minikube   Ready    control-plane,master   39m   v1.22.1
In most cases, if following the instruction doesn’t help, you should try to delete the cluster with:
minikube delete
PS C:\Users\Administrator> minikube delete
* Stopping node "minikube"  ...
* Powering off "minikube" via SSH ...
* Deleting "minikube" in hyperv ...
* Removed all traces of the "minikube" cluster.
Good luck
Phương Nguyễn
Reference : https://viettechgroup.vn/how-to-install-docker-and-kubernetes-for-windows-11-with-wsl-2-or-hyper-v.html
Được đóng lại.