
OWA Redirection Doesn’t Work After Installing November 2021 Security Updates For Exchange Server 2019, 2016, Or 2013
Symptoms
After you install the November 2021 security updates (KB5007409) for Microsoft Exchange Server 2019, 2016, or 2013, Outlook on the web (OWA) redirection in a hybrid environment is broken.
For on-premises deployments, the inter-site OWA redirection might also stop working for environments that are not using the forms-based authentication (FBA) protocol.
Expected behavior
For hybrid environments
When a user who has an Exchange Online mailbox logs in to OWA on-premises, they receive a redirect URL that points them to https://outlook.office.com.
For on-premises environments
In an Exchange deployment that spans multiple Active Directory (AD) sites that use different URLs to access OWA (for example, site 1 = https://site1.contoso.com/owa, and site 2 = https://site2.contoso.com/owa), a user who has a mailbox in site1 and who logs in to OWA by using the “site2” URL will be silently redirected to the “site1” URL.
Actual behavior
In both the expected scenarios, the user can’t log in, and receives the following error message in Exchange Server 2019 or 2016:
Something went wrong.
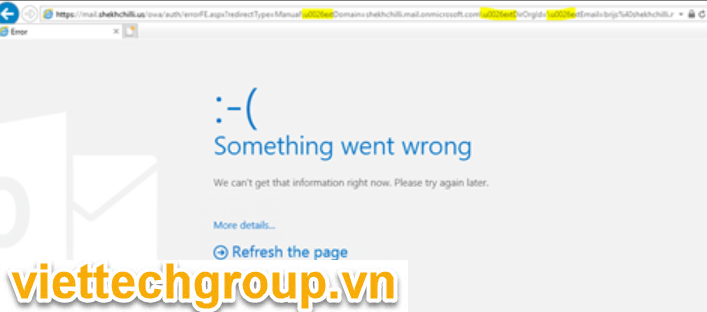
The user receives the following error message in Exchange Server 2013:
External component has thrown an exception.
Workaround
For an on-premises cross-site redirect failing scenario
Workaround 1
Configure the OWA and ECP virtual directory on all the affected front-end servers to use FBA.
Workaround 2
Ask users from each site to use the appropriate site-specific OWA URL to log in.
Example:
Users who have a mailbox on site 2 should use https://site2.contoso.com/owa.
For a hybrid scenario
Workaround 1
Users can use the direct URL for Exchange Online OWA in the browser at https://outlook.office.com/owa.
Workaround 2
Note The following workaround applies to only Exchange Server 2019 and Exchange Server 2016.
Exchange Server admins can use the redirect rule to modify the redirect URL so that the error does not appear to users. The steps for this workaround have to be configured on all servers that handle OWA traffic.
Steps to apply the URL rewrite
- Open IIS Manager. In the Connections pane, expand <ServerName>, expand Sites, and then select Default Web Site.
Note In this step, replace <ServerName> with the name of your server. - In the Features (center) pane you should see the URL Rewrite feature in the IIS area. If you do not see it, the feature might not be installed. In this case, you can download the installation package from URL Rewrite: The Official Microsoft IIS Site. This installation does not require a restart. However, it will restart the IIS app pools.
Note Make sure that you install the X64 version.If the URL rewrite module is already installed on the servers, and the servers are configured similarly by using pathing, then you can copy the Web.config file from the Wwwroot folder on the first server to the other servers after you make the change. Notice that you might have to wait a short while for the changes to take effect on the first server.
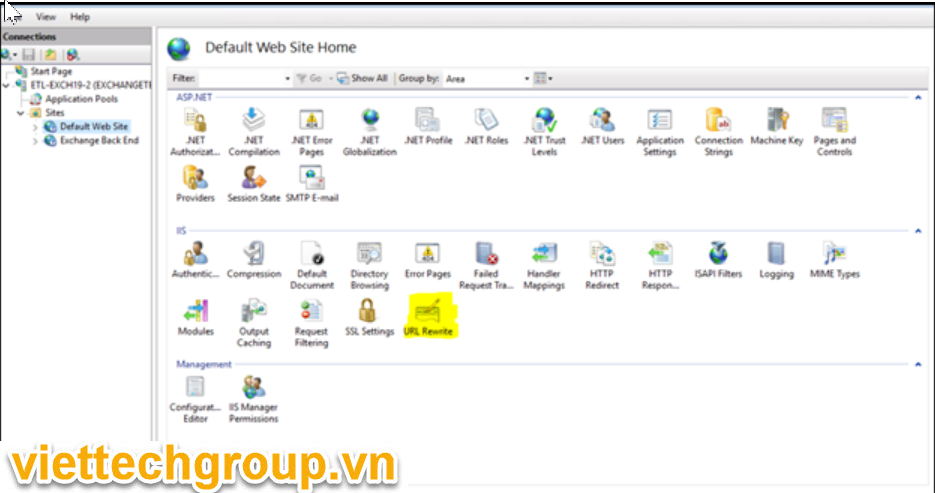
3 .Double-click URL Rewrite.
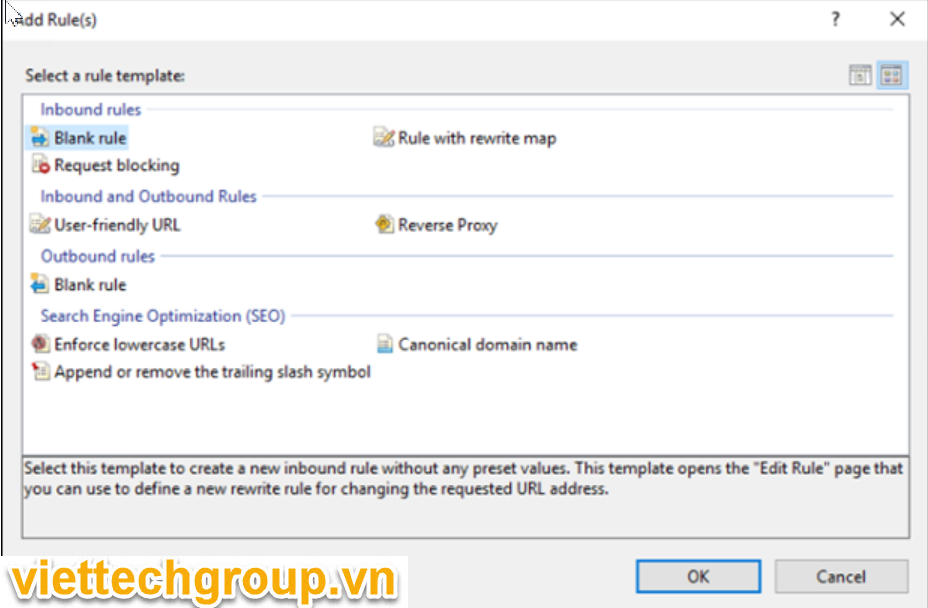
4. In the Actions pane, select Add Rule(s).
5. In the Add Rule(s) window, under Inbound Rules, select Blank Rule, and then select OK.
6.On the Edit Inbound Rule screen, in the Name box, enter Nov21 OWA redirect fix.
7. Leave Requested URL as Matches the Pattern.
8. Change the value of Using to Wildcards.
9.For Pattern, enter *owa/Auth/errorFE.aspx*.
10.Leave Ignore case selected.
11.Select the Conditions list to expand it, and then select Add.
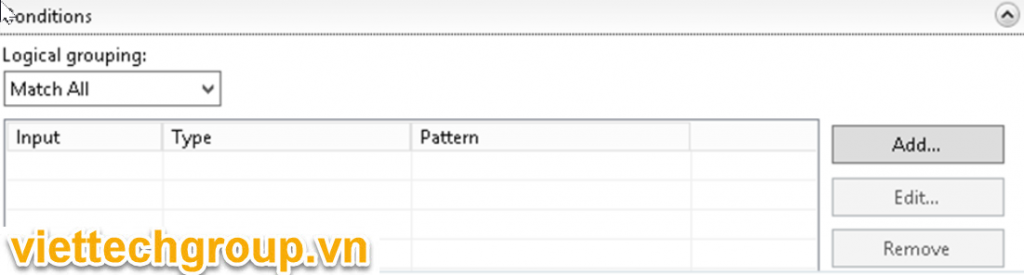
12. In the Edit Condition dialog box, in the Condition input box, enter {REQUEST_URI}.
13. Leave Check if input string as Matches The Pattern.
14. For Pattern, enter *\u0026*\u0026*\u0026*.
15.Select OK.
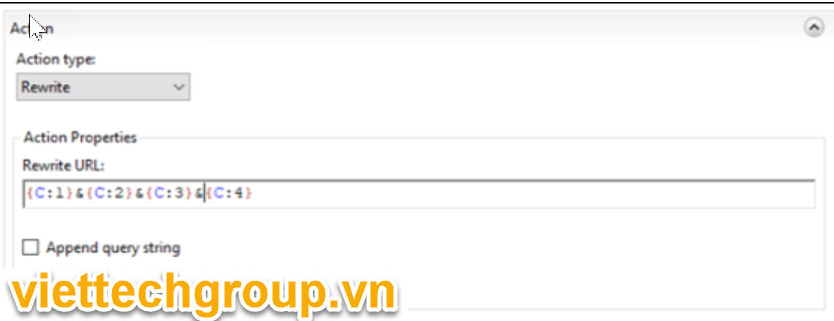
16. In the Action dialog box, select Rewrite in the Action type list.
17. Under Action Properties, in the Rewrite URL text box, enter the following code:
{C:1}&{C:2}&{C:3}&{C:4}
18. Clear the Append Query String checkbox.
19. Select the Log rewritten URL checkbox.
20. In the Actions pane, select Apply.
20. Select Apply, and then select Back To Rules.
21. In the URL Rewrite window, select the rule that you just created, and then check in the Actions pane under Inbound Rules to verify that the rule is enabled.
This new rule should not require an IIS reset, and it should take effect as soon as you enable it. You can now test it by using OWA (by using the account that reproduced the problem) to verify that you get the expected URL redirection.
Source Microsoft
Phương Nguyễn Collect
Được đóng lại, nhưng trackback và pingback được mở.