
There are times when you need to know how to add a non-Microsoft account to Windows 10. Microsoft accounts come with the advantage of syncing your settings across multiple devices. However, some users prefer giving that up, in exchange for the more secure and private experience of a local offline (non-Microsoft) account. If you don’t want to share your info with Microsoft and you ask yourself “How do I add another user to Windows 10 without a Microsoft account?”, you’ve come to the right place. This tutorial illustrates six ways to create a local or non-Microsoft user account in Windows 10:
1. Add another user to Windows 10 without a Microsoft account from Settings
We find it easiest to create a non-Microsoft account with the Settings app. First, open Settings by pressing Win + I on your keyboard, and then click or tap on Accounts.
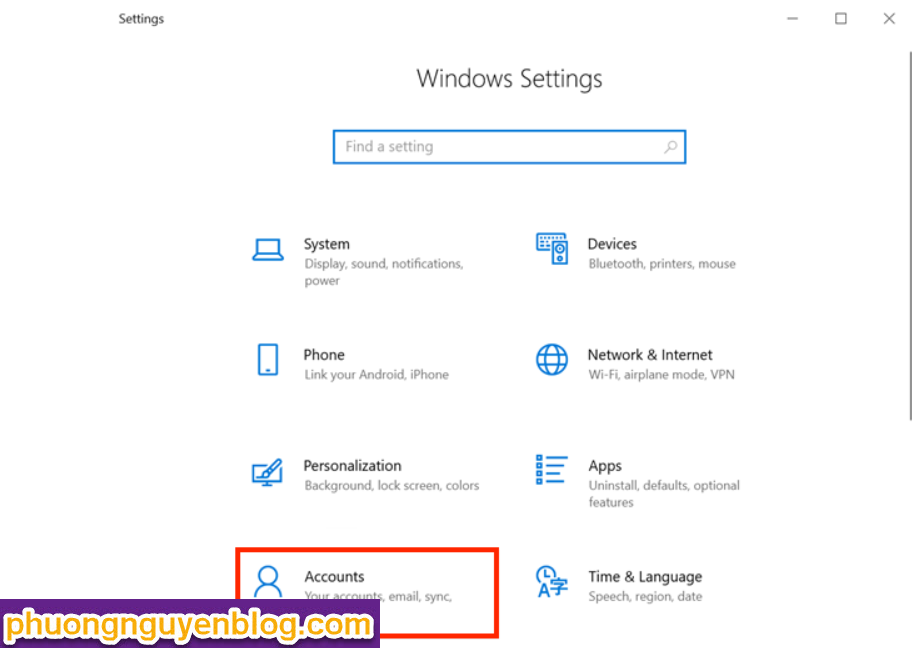
In the column on the left, click or tap on the “Family & other users” tab. On the right-hand side, under Other users, press the + button next to the “Add someone else to this PC” option.
The Microsoft account wizard opens, asking you to enter the email or phone number of a Microsoft account. Click or tap the “I don’t have this person’s sign-in information” link underneath.
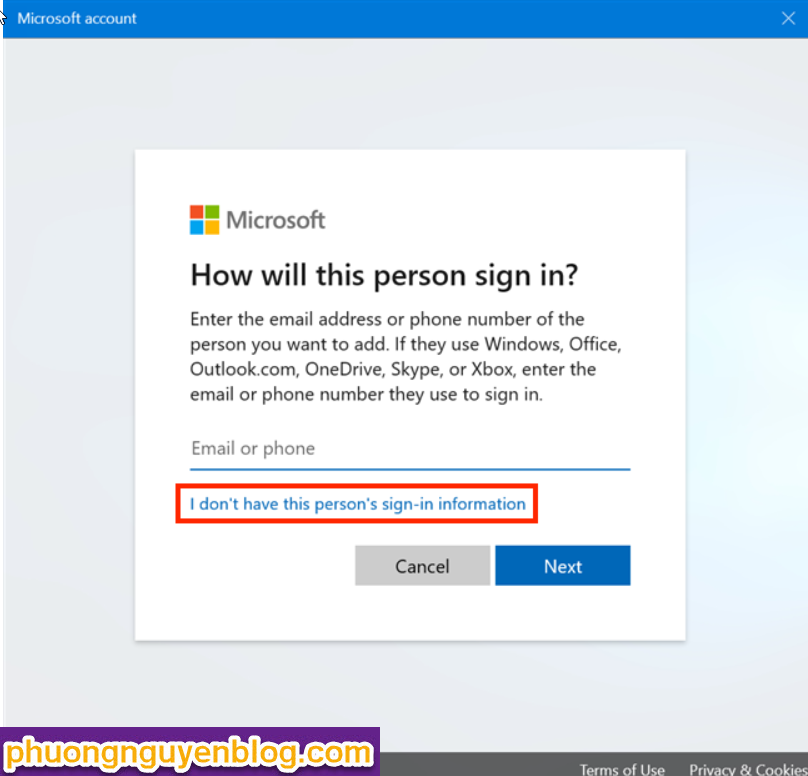
Microsoft then tries to get you to create an account. Stand firm and click or tap on “Add a user without a Microsoft account” link, then press Next.
Next, you can enter your desired User name under “Who’s going to use this PC?”. Enter a password and verify it to make your account secure.
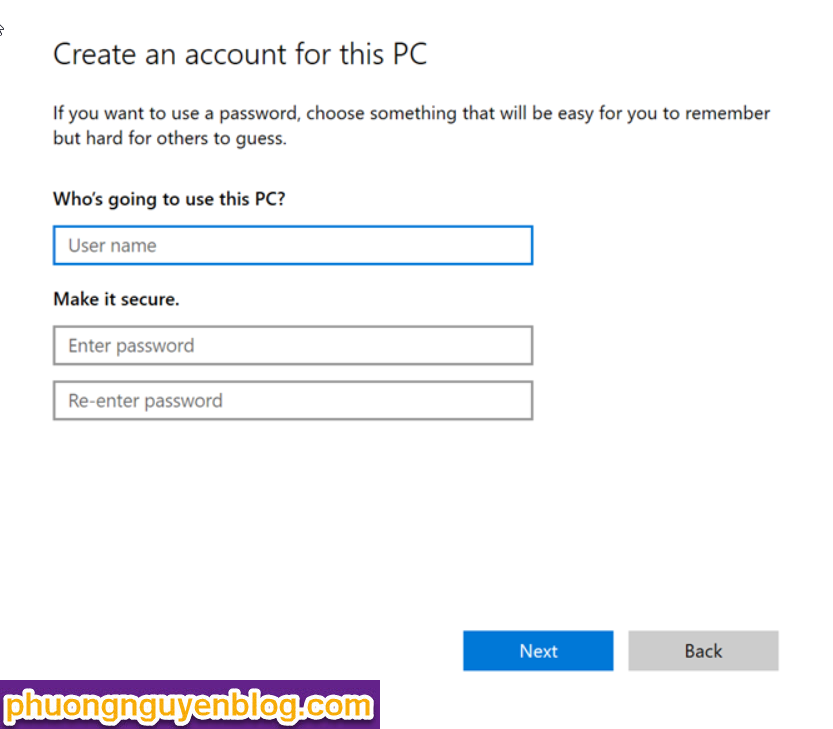
The moment you start to insert a password, six more fields are revealed at the bottom of your screen, in the “In case you forget your password” section.
You have to choose three security questions from the list and provide an answer for each of them. Click or tap on each field to either open a dropdown menu with the available questions or to type in an answer. When you are done, press Next.
2. Convert your Microsoft account into a local one in Windows 10
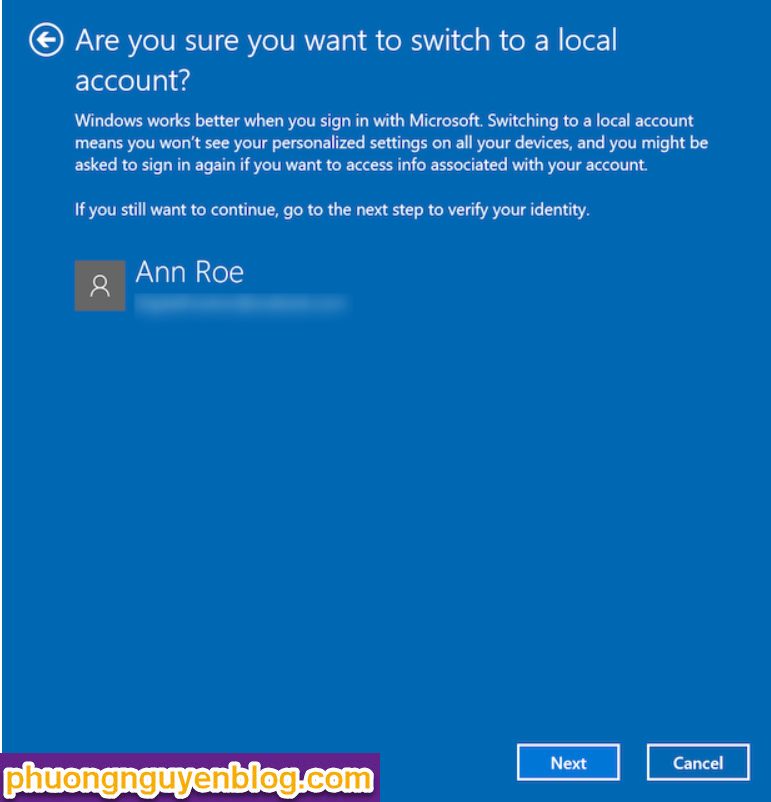
If you already created a Microsoft account, but you want to increase your privacy and stop sharing your data with the company, you can convert your Microsoft account into a local one. We created a tutorial with all the details necessary for switching to a Windows 10 local account from a Microsoft one.
3. Create a non-Microsoft account in Windows 10 with netplwiz
You can also use the netplwiz app to add a local user account. To begin, open the Run window with the keyboard shortcut Win + R and insert “netplwiz”. Then, press OK or Enter on your keyboard.
In the Users tab of the User Accounts window, first, make sure the box next to the “Users must enter a user name and password to use this computer” option on top is checked. Then, click or tap on Add.
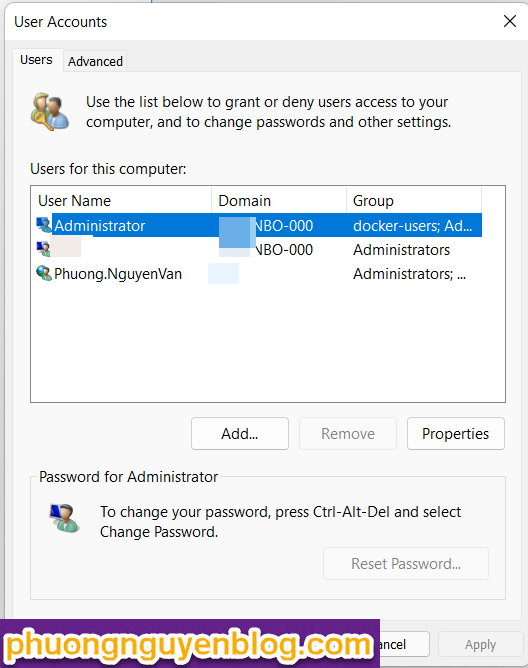
In the next pop-up window, click or tap “Sign in without a Microsoft account (not recommended).”
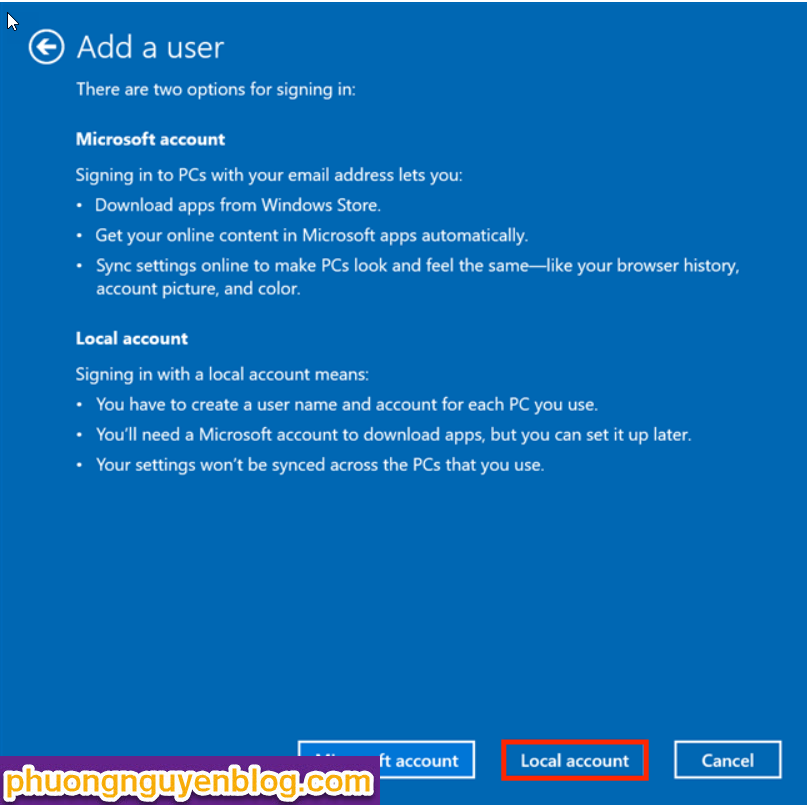
Next, you are presented once more with all the advantages of using a Microsoft account.
The lack of syncing across devices can be a downside, but it is the only one, even if Microsoft suggests that you need one of their accounts to download apps. While this might seem like a big incentive to get a Microsoft account, it is just a scare tactic. We have a guide showing you How to use the Microsoft Store in Windows 10 without a Microsoft account, so go ahead and press the Local account button.
Enter a new User name, choose and confirm a password, and add a Password hint. Then, click or tap on Next.
Press Finish to complete the process of creating a local account.
4. Add a local user account to Windows 10 using Computer Management
If you’re running Windows 10 Pro on your computer or device, you can also use the Computer Management tool to create a local account. Open Computer Management and click or tap on “Local Users and Groups” under System Tools.
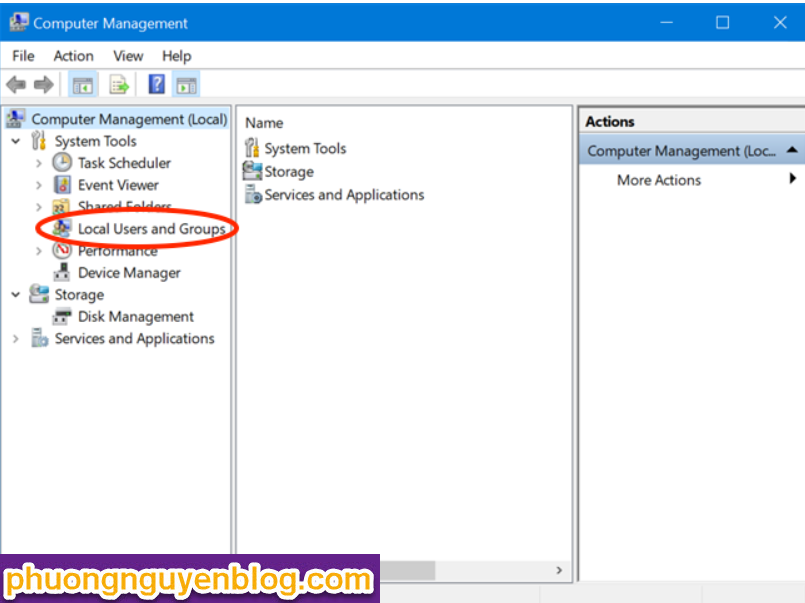
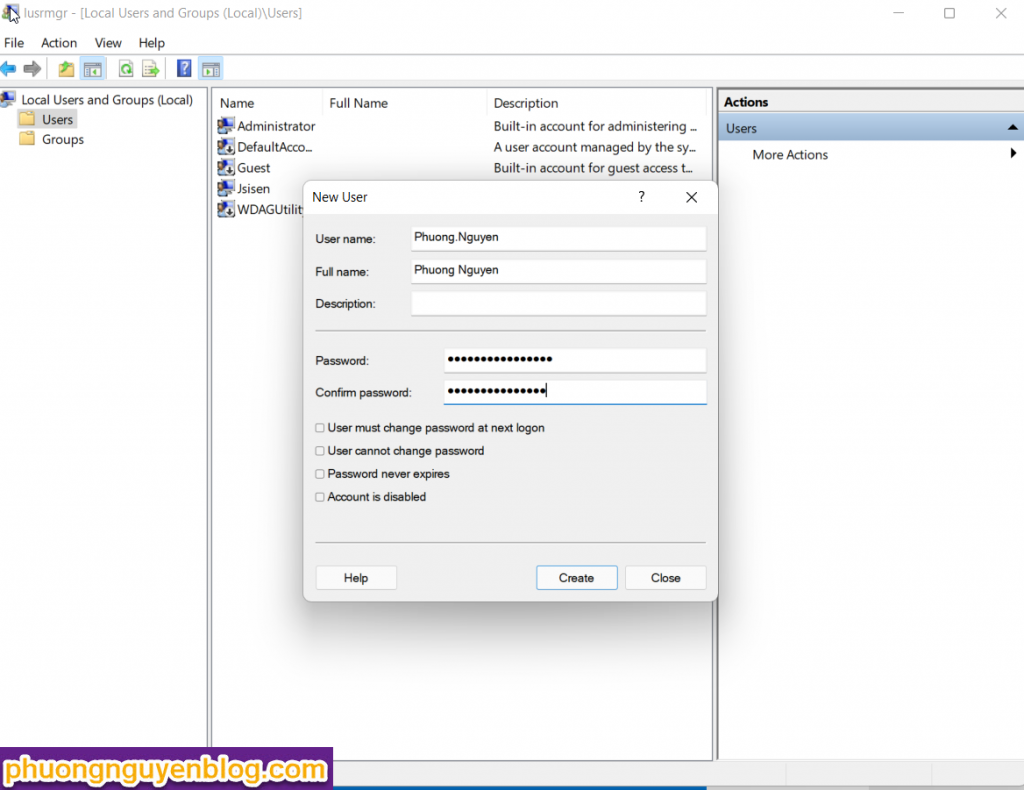
In the middle pane, right-click or press-and-hold on the Users folder, and then click or tap New User on the contextual menu.
The New User window pops up. Choose a User name, then insert and confirm your password. You only need to fill in the User name field. The Full name uses the same info once the account is created. However, if you insert a different Full name during this step, this is the name displayed in Windows 10 for this account (including on the login screen). Check the boxes if you want to apply to the new account any of the options displayed next to them. Then, press Create and Close the New User window.
If you access the Users folder in Computer Management, you can see the new account displayed inside.
5. Add a non-Microsoft account to Windows 10 with CMD or PowerShell
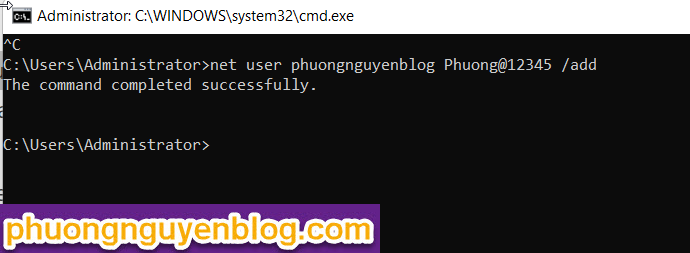
If you like using command-line interpreters, both the Command Prompt and PowerShell can be used to add a local user to Windows 10. The steps are identical for both apps, but we only go over the ones for the Command Prompt.
Start the Command Prompt as administrator by searching “cmd” in your taskbar’s search field and then clicking or tapping on the “Run as administrator” option.
Confirm your choice in the UAC window that pops up, and the Command Prompt is launched.
The command you need to enter is relatively simple: “net user NAME PASS /add” – replace NAME with the name of the account you are creating and PASS with the password for that account. Below, we created a user called Phuongnguyenblog using the password Phuong@12345.
NOTE: You can completely remove the PASS value from the command, and the newly created user can login without a password.
6. Create a local offline account while installing Windows 10
You can also create a non-Microsoft user while installing Windows 10. During the installation process, when asked about the account that you want to use, you should get the Offline account option.
Good luck
Phuong Nguyen
Được đóng lại, nhưng trackback và pingback được mở.